
Basic Infantry Skills
Navigation
It is essential to understand how to read a map and use tools to find your location and any other target location on the map. Also being able to Navigate based on your position and your target position.
Reading the Map
Grid
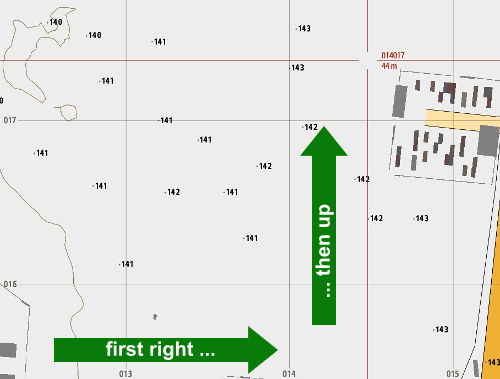
ArmA uses a 6-digit grid system (3x3). Grid coordinates are being read in the following way: first 3 right, then up. On a 6-digit grid system one side of a grid is 100 meters which makes a grid an area of 100 x 100 meters.
Given that you know your own grid coordinate, you only know that you are in an area the size of 100 x 100 meters. Therefor you need to learn on how to take all information displayed on the map to be able to find your exact location.
Landmarks and Objects
The displays Forests, Trees, Buildings, Roads, Water, and many other Landmarks and information. You need to learn how to transfer something you see onto the map and vice versa. Often it can be easier to navigate by landmarks opposed to bearings and distances.
Contour Lines
Contour Lines are information which are displayed based on your zoom level on the map. Each line marks a difference in height. You can add the amount of contour line between you and a point on the map, then multiply it with the Contour Line Scale and you have the height difference between two points.
Hill Numbers
These are the numbers scattered on the map. They mark the height of hills or mountains. They can be used as references such as "Hill 362". Note that they are dynamic based on zoom level. Therefore, you need to be specific.
Finding spotted objects on the map
Basic Method:
- Step 1: Find your Location - You should always know your exact location on the Map.
- Step 2: Compass Bearing - You need the Compass Bearing of the spotted object relative to your position.
- Step 3: Distance - You need the Distance between you and the spotted object.
- Step 4: Combine - Your position is the starting point. The Compass Bearing is a line starting at your position at the Compass Bearing direction. Lastly the Distance is the point on that line which marks the object's location.
Often it is easier to use distinctive reference points:
- Step 1: Find your Location - You should always know your exact location on the Map.
- Step 2: Find a distinctive Reference - Any distinctive Landmark in the general direction of the spotted object which you found on the map, and you have eyes on.
- Step 3: Object Location from Reference - Since you know the location of your Reference you need the relation of your object and the Reference and with that you know the object's map location.
Notice that it is often enough to know the approximate location on the map for spotting targets, like artillery. Since the artillery might not be 100% accurate in the first place, and secondly you can call corrections after an initial strike, correcting based on the last fire mission.
GPS
The GPS is showing your exact grid location on the map and your height above sea level. The GPS overlay (activate with Right Ctrl + M) also shows the Compass Bearing you are looking at. All information are in real time.
Map Tools
Map tools can be displayed by using ACE-Self Interaction while on the map screen and select show Map Tools. There is a small version and a normal version. Other than for Mortar Fire Support the small version is enough. Once selected to show it will appear in the bottom right corner of the map. You can drag it wherever you need it. In order to rotate it around hold alt while dragging with your mouse.
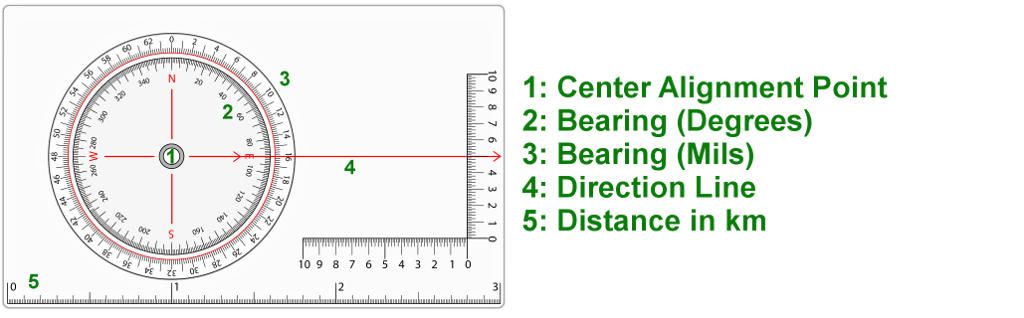
Bearing in degrees is used by default. Mils are only relevant for Artillery Fire Support. More details can be found in the ACE3 Documentation.
Map Markers
Map Markers are displayed based on the channel they are broadcast in. You can find the channel you are in at the bottom of your map. Generally we use "Side" channel for markers. There might be situations where Markers will only be put on "Group" or "Command" channel.Cycle through channels with ,, ., note that these are the default keybindings. To place a marker double-click on the map.
| Channel | Recipients |
|---|---|
| Global | All Players |
| Side | Your Faction |
| Command | All Faction's Leaders |
| Group | Group Members |
| Vehicle | All Players in same Vehicle |
| Direct | Players in close distance |
Furthermore there are also the options to point at the map LMB (visible to people in proximity) or to draw on map ALT + LMB (channels apply like for map markers). To delete markers and drawings hover over and DEL.
| Marker | Pointing | Drawing |
|---|---|---|
 |  |  |
There are some guidelines when it comes to markers:
- unique
- simple
- short
- meaningful
Use a letter and number combination, if useful the time you placed the marker (e.g. EI 4 - 12:00 NW = Enemy Infantry 4 men moving north-west marked at 12:00). Usually use the "Dot" marker.
| Marker | Meaning |
|---|---|
| "EI" + Number | Enemy Infantry (number as count) |
| "BTR" + Number | BTR |
| "APC" + Number | APC |
| "BNK" + Number | Bunker |
| "TNK" + Number | Tank |
| "AA" + Number | Anti Air |
| "AT" + Number | Anti Tank |
| "TECH" + Number | Technical |
| "50c" + Number | 50cal HMG (Static) |
| "OP" + Number | Overwatch Position |
| "WP" + Number | Waypoint |
| "WA" + Number | Waypoint Alpha (...) |
| "C" + Number | Compound when place on a compound for better reference. |
| Number (on a Building) | Building Number for reference |
| Dot no Text on Building | Building Cleared |
| "LZ" /+ Name | Landing Zone |
| "DZ" /+ Name | Drop Zone |
| "EZ" /+ Name | Extraction Zone |
| REINF | Reinforcements insertion position |
| Gold + Number | Predominantly Civilian Settlement |
| Silver + Number | Predominantly Military Compound/Base |
- Colouring - Marker in regard to Enemies should be red. Friendly markers e.g. Waypoints should be marked blue. Aviation markers should have a different colour. Generally use consistent colours to help identifying markers more efficient.
- Numbers - Each Enemy marker either on Vehicles or Bunkers should have an individual number for easier reference. This also includes Buildings, Compounds and Waypoints. Enemy Infantry markers are the only exception where the number represents the identified count of enemies spotted.
- Name - Each Name should be unique for easy reference.
Rangefinder
Rangefinder are tools to measure a distance. We mainly use the Vector 21. It allows you to get the distance R and azimuth Tab of your target. It takes the slot of the binoculars. Alternatively Laser designators work as well.
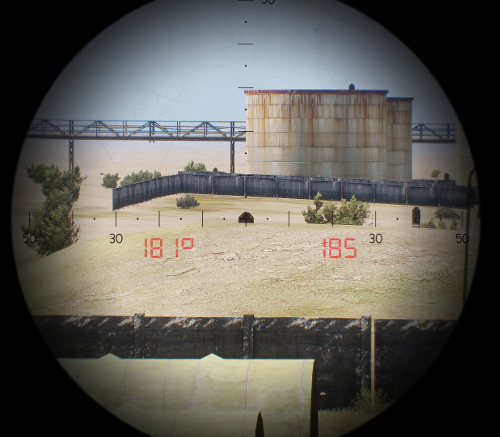
In addition, you can find the horizontal distance to a target and the height difference between your location and the target by first tapping R followed by hold R. Furthermore, you can also get the distance and direction between two point. Therefor you press and hold R. Once the circle appears press Tab and keep holding R. Once the P-1 info appears aim at your second point and release R. More functions can be found in the official ACE3 Wiki.
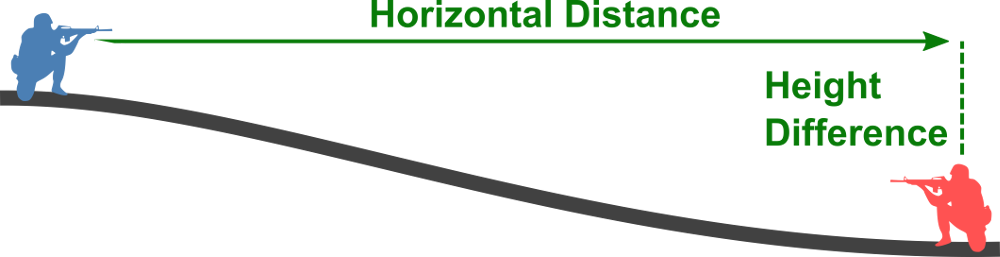
- Direct Distance - Used to zero weapons onto targets.
- Horizontal Distance - Used to produce an accurate map marker location. Since the map is a 2D environment. The larger the height difference the higher the deviation in distance.
Navigation Video Tutorial
Situational Awareness
Being aware of what is happening around you is important to understand the situation and make proper decisions.
General
- Always scan for enemies - Whether you are moving or not, always scan for enemies.
- Cover sectors - Cover Sectors you are assigned to and if you do not have an assigned sector, cover the area which seemingly needs to be covered.
- Take cover - Whenever you are not moving, crouch down, find cover if possible and scan for enemies. Also, always know the next piece of cover around you prior to a fire fight.
- Stay aware - There is no safe place in a combat area. Avoid "tunnel vision", do not get focused on only one small area.
- Check the map - Keep yourself up to date about your surrounding terrain, friendly locations and marked enemy positions.
- Hard contact versus soft contact - Soft contact is an enemy contact with the enemy not being alerted or aware of your position. Hard contact is an enemy contact with the enemy being aware of your location and process of engaging you or directly being in an engagement with you.
- Squad mate radar - Frequently check the radar at the bottom of your screen displaying the location of squad mates around you
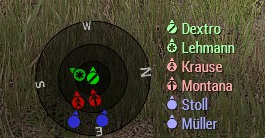
Inner circle is 15m, middle circle is 30m and outer circle is 50m.
Identification
Identify your targets. You need to be able to identify friendlies, hostiles and civilians. Also scan for other threats like explosives and traps.
BLUFOR Tracking - Our BLUFOR Tracking will show the locations of friendly units, more precisely the location of the leader of the friendly unit. That does not mean every friendly has to be close to a leader. Stay aware of friendly movement, positions and objectives. Positive identification - Do NOT fire unless you positively identified your target as hostile. Gun sounds and tracer color might help. Is this ours? - Is this smoke ours? Keep track of friendly positions to identify whether hostile area in the area or friendlies.
Supporting Behavior
- Signal - Maybe use hand signals and see for a response when in doubt. Signal to unknown to identify yourself and look for a response.
- Listen - Not only listen to information by your teammates. Also listen for voices and gun shots. When you hear a gun shot you often hear two different sounds. First you hear a loud bang followed by a delayed quieter bang. The first bang is the bullet pacing with higher the sound speed and the resulting supersonic shockwave. The second quieter bang is the actual gun fire sound since its sound is slower than the bullet.
- Gun safety - Do not point your weapon at things you do not want to shoot.
- Free look - Use the free look in order to keep your weapon at your sector, but to look around and behind you.
Movement
Movement or in other words: How not to get killed.
General
- Spacing - Spacing is important. Unit cohesion requires a certain proximity between units although bunching up will maximize damage by explosives. Therefor ensure you are always close enough to be able to see and interact with them and on the other hand avoid bunching up.
Cover and Concealment
- Cover - Any object or terrain aspect which is capable of stopping bullets and shrapnel. Cover can be trees, solid walls, vehicle wreck, dead bodies and many more thing.
- Concealment - Anything which denies you getting spotted by the enemy.
Guidelines
- Utilize Cover - Always more from cover to cover. Whenever you are moving you should be aware of potential cover around you, to immediately take effective cover, in case of incoming fire.
- Out of contact - Whenever you hold movement you should crouch down. Seek concealment.
- In contact - Only strictly more from cover to cover. When caught out of cover, go prone. Sprint from cover to cover when moving. Generally always go prone when holding to achieve a maximum coverage. Afterward, slowly increase your exposure when aiming to return fire.
- Urban environment - Going prone might not be viable at times, because the lack of mobility versus effective cover.
Stances
ArmA 3 offers a large variety of vertical (Ctrl + W or S) and horizontal (Ctrl + A or D) stance adjustments. Make sure to minimize your exposure by utilizing the different stances. There are three basic vertical stance categories and each comes with 3 versions (low/normal/height).
| Stance Indicator | Vertical Adjustments |
|---|---|
 |  |
In addition to the horizontal stance adjustments you can also lean left Q and right E. Following examples are horizontal adjustments while crouching. Same applies to standing. Leaning while being prone does not work and the keys will make you roll to the according sides.
| Stance Indicator | Step-Leaning left | Leaning left | Normal | Leaning right | Step-Leaning right |
|---|---|---|---|---|---|
 |  |  |  |  |  |
Note that stances influence not only exposure, they also influence accuracy, movement speed, and stamina.
- Stand:
- high profile
- high movement speed
- least exhausting while moving
- bad stamina recovery rate
- lowest accuracy while static
- highest accuracy while moving
- Crouch:
- medium profile
- medium movement speed
- highly exhausting while moving
- decent stamina recovery rate
- medium accuracy while static
- lowest accuracy while moving
- Prone:
- low profile
- low movement speed
- exhausting while moving
- good stamina recovery rate
- high accuracy while static
- cannot fire while moving
Stamina
Your stamina is influenced by the terrain you are operating in and the weight of your equipment. Climbing up a hill is more exhausting than moving in flat terrain. Fatigue will lead to great loss of accuracy. Having the weapon lowered while moving will also lower exhaustion. A soldier should never carry more around 35 kg. For normal out of combat movement ensure that you are normally walking with you weapon lowered for maximum stamina efficiency.
Obstacles
There are a large variety of obstacles. Generally people find a way around them. One important aspect is how to utilize holes in walls. Obstacles often mean that you need to put yourself in a disadvantageous spot to pass them. Therefor you should minimize the time of your exposure.
Utilize wall gaps
| Pie the corners | Line up | Roll under | Check close corner | Move out |
|---|---|---|---|---|
 |  |  |  |  |
Always take the opposite side of the person in front did.
Climbing
We use Enhanced Movement Modification which enables players to climb over walls. Furthermore, it allows you to climb through windows, same as ACE 3 Climbing does ("Alt"+"v"). While Enhanced Movement allows you to climb all sorts of objects and buildings we demand our members to use it in a productive and realistic manner. The default key for climbing is SHIFT + V.
Interaction
There are various interaction options coming with the ACE modification. Generally there are two categories: Self Interaction Left Ctrl + WIN and Interaction with others WIN. Also, there might be interactions accessible by scrolling and picking them out of the action list (default ArmA method). Here is a list of the important ones, excluding medical (see Medical Section):
- Passing Ammo - You can pass ammunition to teammates by interacting with their interact symbol...
- Team Color - You can change your team color under self interaction, team management...
- Radio Template - You can select a radio frequency profile with self interact, team management...
- Change Call Sign - You can change your team color under self interaction, team management...
- Attach Equipment - You can attach IR Strobes and other items under self interaction, equipment...
- Earplugs - You can equip earplugs under self interaction, equipment...
- Prisoner Management - Interacting with a person will offer options like arresting, searching inventory and prisoner movement...
- Map Tools and Light - When on map use self interact...
- Gestures - Under self interact, gestures...
- Call Supply Drop - Only for leaders and when available in mission under self interact...
Furthermore you can open backpacks of teammates with the action menu (scroll wheel) to access their backpack inventory, often used for equipment and ammunition transfers between soldiers.
Weapons
Everyone is a rifleman first. Whatever role you will take, you need to be able to accurately fire a gun, know how to operate it, and when to use it and how to use it.
Guidelines
- Muzzle discipline - Do not point the gun at non targets.
- Trigger discipline - Do not accidentally shoot.
- Awareness - Do not cross somebodies line of fire. If you have no choice alert the person before doing it.
Rules of Engagement
- Default ROE - Unless told otherwise.
- Only open fire in defense of yourself or your teammates.
- Proximity: Close enemies are posing a higher threat
- Awareness: Enemies who are not aware of our presents do not pose a threat.
- Potential: If proximity and awareness might not be given, though the enemy is potentially posing a high threat against other team elements.
- Return fire if fired upon.
- Otherwise request permission to engage.
- Only open fire in defense of yourself or your teammates.
- Weapons Free - Engage all identified targets. Identification must be reasonable not absolute.
- Weapons Hold - Only engage immediate threats, excluding potential threats.
Orders influencing engagements:
- Open Fire - Permission to engage.
- Hold Fire - Maintain target focus, but do not fire.
- Cease Fire - Stop firing.
Marksmanship
Being able to hit a target at various ranges and speeds is more than just shooting.
Ballistics
Understanding bullet trajectory is important when engaging target at ranges. Bullets drop over range. It is important to know the range of your target to adjust your aim.

Zeroing your weapon, meaning to adjust the weapon sights to a certain range can be helpful. Otherwise, you might have to take the range the weapon is configured on and either aim above or below the target to hit. If your weapon sights allow you can zero them to certain ranges using Page Up and Page Down. The distance your weapon sight has been configured for you will find on the HUD. Zeroing might be more relevant for longer engagement distances in regard to firearms, although it is extremely important for heavier projectiles with higher drop rate like 40mm grenades or even rockets.
Bullets and other projectiles need to travel to their destination. There are not instantly there. Especially when shooting at moving targets you need to mind the travel time of the bullet, meaning that you need to aim ahead your target in its direction of movement. Tracers might help to track your own fire or the fire of friendlies. If you are paired up with a machine gunner trace his fire but looking at the tracers and call corrections if needed.
Factors influencing your accuracy:
- Stamina - Fatigue has a negative impact.
- Stance - Influences accuracy.
- Breath Control - Holding your breath increases accuracy temporary. Holding it for too long will massively decrease your accuracy in the short term.
- Injuries/Pain - Wounds and pain negatively influence your accuracy.
- Weapon Resting - Using bipods or rest your weapon will increase your accuracy C.
Reloading and Ammunition
Know when to reload can save your life. There are two different types of reload:
- Tactical Reload - Reloading a partially full magazine in order to get a full magazine. This can occur if the magazine is almost empty and the current fire fight is over, or you advance and expect a lot of contacts. Also in CQB environments when clearing buildings. Generally whenever you will potentially need a full magazine.
- Dry Reload - Reloading an empty magazine. Often especially in CQB it might make more sense to switch to pistol and continue clearing the proximity before reloading.
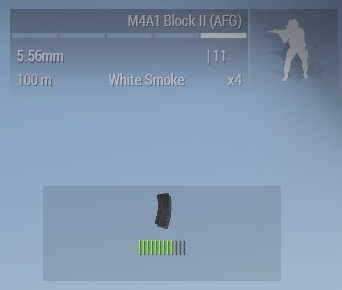
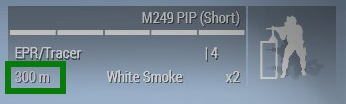
Keep track of your ammunition. The HUD will only display the amount of magazine you have regardless of them being full or partially empty. You can check the current state of your magazine in your weapon by pressing L Ctrl + R. It will display a categorized amount of bullets in your magazine. Partial magazine can be repacked, meaning that you will pack all magazines together that you end up with as many full magazine possible out of the amount of bullets you have. Repacking magazine can be done through ACE self interact. You should do this whenever the situation allows. Since it takes a while to do, make sure that you do not start right before the order to move out. You do not own your ammunition. It is belongs to the team same as all your gear share if required.
Your weapon can jam, especially when weapon temperatures rise. You can clear a jam by pressing L Shift + R.
Gear
Gear Customization
Our policy allows minor gear customization. Everything else is being handled by loadouts. Generally you are allowed to modify your weapon sight which is done by an action box at the base of operations. Green colored equipment is free to use for everyone, other colors require permission.
Explosives
Explosives are handles by the ACE interaction and self interaction menus. To place a charge use self interact follow the menu. Once you place a charge you need to select a trigger. Therefor interact with the charge and select the desired trigger. If you do not carry any triggers, you can always choose a timer. Communicate whether you place a charge, it is hot, and you are about to blow it. You can defuse mines and other explosives by crawling towards them and interact with them. More information can be found here.
Rocket Launchers
Rocket Launchers have backblast. Only fire if you are cleared. Shout "clear backblast" and wait for the response by your buddy "backblast clear". Avoid firing them inside buildings.
- Disposable Launchers - Usually need to be prepared by pressing the reload button. This will bring up the sights and allow you to shoot. Once fired the used tube will be automatically dropped when switching to another weapon. They are one time use only. Disposable Launcher are for example: M136, M72, RPG-26.
- Reloadable Launchers - These Launchers can be reloaded, sometimes that includes multiple types of available ammunition. Some of them can also be reloaded by another soldier (Ammo Bearer) by ACE-Interaction with the Launcher. Reloadable Launchers are for example: MAAWS (Carl Gustav), RPG-7, Javelin.
MAAWS (Carl Gustav)
- Reload - Can be reloaded with ACE-Interaction by personnel carrying the appropriate ammunition.
- Airburst - HE Ammunition can be set to Airburst. Set the Airburst Range before firing and fire the rocket above your enemy. Airburst is maximizing the effectiveness on soft--targets (infantry).
Javelin
- Locking Target - In order to lock onto a target you require the target to have a thermal signature. Furthermore, you need to switch into thermal vision (TAB to lock).
- Fire Mode - The Javelin provides two modes: Top and Direct Fire. When using Top Fire the rocket will take a trajectory which leads to it hitting the target directly from above. Direct Fire will make the rocket to climb to travelling height before directly flying at the target (CTRL + TAB).
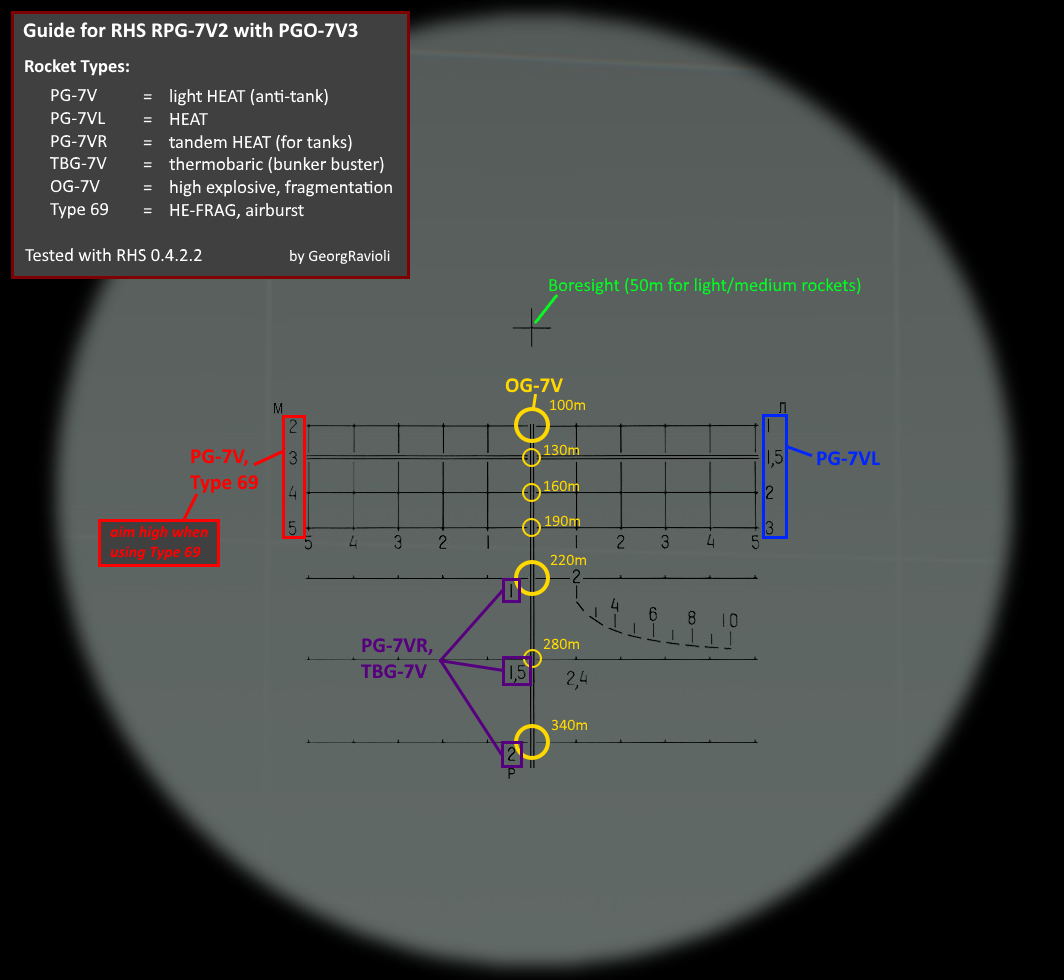
RPG-7
Parachuting
- Static Line - A low altitude jump with a non-steerable parachute.
- Freefall - Usually high altitude jump with steerable parachute.
- HALO - High Altitude Low Opening
- During freefall steer towards the dropzone and control your freefall.
- Open parachute at 250-300m / open higher if required to reach the dropzone.
- HAHO - High Altitude High Opening
- During freefall steer towards the dropzone and control your freefall.
- Open parachute using following guidelines:
- 800m altitude for each 1 km of distance from dropzone (not that wind will impact your gliding)
- may add additional 200m altitude for safety.
- may add additional altitude to compensate terrain height difference between dropzone and plane exit point.
- HALO - High Altitude Low Opening